Showing posts with label Midwinter Blues. Show all posts

Friday, February 27, 2015

Show and Tell and Revolutionary Flags Border


 First up,  Show and Tell.

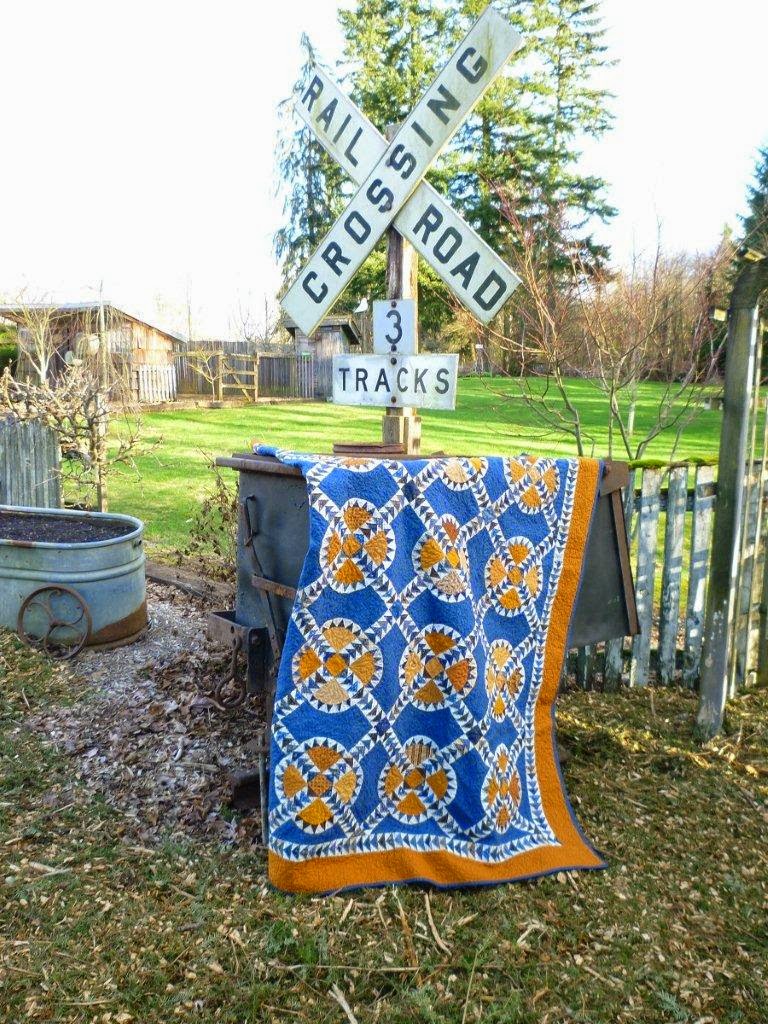
My friend Laurie made this wonderful Railroad crossing quilt. You can find info about it HERE.
I told her my one regret was not making mine larger, so she did! I know she took that photo in her backyard. Isn't that an adorable setting for this quilt?
This quilt started a fun friendship!


 Here's mine.
Dale Renee sent me a photo of her lovely MidWinter Blues from my quiltalong. 
What's not to love?!
Thank you ladies for sending me photos.  I really do enjoy seeing your quilts.
Here's the fabric I chose for the border of Flags of the American Revolution.  Looked better in my sewing room than it does on this screen. LOL

I thought I'd show you how I add my borders. It's not the only way and I'm not claiming it is the right way, but it is the way I do it. The book says to cut two  70 1/2 x 3 1/2 for the sides of the quilt. I always measure first. My quilt may be different.

 Woo-Hoo! 70 1/2" I was pretty excited about that measurement. 
 Huh? A whole inch bigger in the center? That sucks, but didn't really surprise me.
Other end.. 71", okay, not too bad. I take the 3 and average them. 
70.5+71.5+71.=213 divided by 3 is 71". That's how long I'll cut my border strips for the top and bottom. 


I don't have a huge studio so this is how I measure my long border strips. After cutting it 71" I mark the center of the border strip and the center of my quilt, line them up, then start pinning.
I do the same thing for the other direction once these two borders are sewn on.

You know what that means? MY BORDERS ARE ON! And that quilt top is complete! I couldn't be more thrilled!
So lets link up on Monday. If your top isn't done, that's fine, show us the blocks we haven't seen yet. This will be our final link up for Flags of the American Revolution quilt.

Have an awesome weekend!

Monday, February 24, 2014

Midwinter Linky Winner

Thank you all for your lovely emails and comments about my dad. I had a good visit with him and made it safely there and back.


Make sure you've seen all the lovely Mid winter blues quilts. There were 21 that linked up! And one FULL size!  All of them were wonderful!! Thank you all so much for sewing along. I do enjoy doing this and seeing all the little quilts.

I've randomly drawn a name from those links and Kathy from Kindred Quilts wins the blues! Congratulations!! Let me know your address and I'll get these in the mail.

Love to you all.

Monday, February 17, 2014

MidWinter Blues Link-Up! Edited Version


Here we go! Add the link to your blog post- please, not just your blog. We want people to click on the link and go directly to the post with your version of Midwinter Blues. It's okay if it is only a top.
If you do not have a blog, please send me a photo and I'll add it.

We want to see it!!

 Edited:
I forgot to add that I will draw a name from those who add their link and they will get a variety of blues- straight from my stash.


Monday, February 10, 2014

Midwinter Blues Grand Finale!

I thought it would be appropriate to capture my finished quilt in the snow. I ache from head to toe from massive snow shoveling.  I am thrilled about how my muscles were working though.
I couldn't be more happy with my little Midwinter Blues quilt. I am thrilled so many of you sewed along!

 It was difficult to see the quilting on the original since it was only a photo. I like how mine turned out, although if you like everything lined up nice and neat you may have to come up with your own plan.
Basically the borders are only quilted in one direction as you can see from my lines (made with the Paint program) and the inner pieced blocks are quilted both directions.(cross hatching) The borders and inner section are spaced 3/4" apart. I made sure my quilting was on both sides of the sashing and measured my lines from there. I used smoke colored clear thread on the top and a matching thread for my backing.
My binding is single width cut 1 1/4" wide, applied to the front and hand sewn to the back. Mine is very narrow, so you may want to cut yours 1 1/2" wide and apply.

I hope you love your quilt as much as I love mine! I'll have a link up party in about a week so we can see all your quilts.


Wednesday, February 5, 2014

Mid Winter Blues part 3

Now we are going to add the sashing strips. When putting blocks on point I always think the quilt looks much more complex. Adding sashing doubles that complexity.

From your sashing fabric you will need to cut 16 strips that measure 1 1/4"x 5 1/2".

For your cornerstones (mine are brown), cut four (4) 1 1/4" squares and eight (8) 1  1/4" x 2" rectangles. Trust me on the oversizing.

Lay out your blocks and sashing in a pleasing manner.

Looking at the quilt layout below add your brown rectangles to the sashing having them as the outer  sections of the quilt. (they will be trimmed to triangles later) Put the four (4) 1 1/4" squares in the center. Press these towards the blue sashing.

Add sashing to the blocks and half blocks.
I start at a corner and work my way through the quilt. You could actually put this on the second row  but I didn't. Line up your centers and sew. 
Continuing adding sashing and rows together, lining up the seams so your rows match. (if it is off a little it really is NOT a big deal)
 
I over-sized my corner triangles and outer cornerstones so I need to trim them up before adding a border.

Use a long ruler, if you prefer, to trim and square up your quilt. Be sure to leave 1/4" seam allowance all the way around. (this isn't a big deal if you don't have 1/4") My quilt measured 16 7/8" square before adding my border.

Be sure to measure across the center of your quilt to get the correct measurements for YOUR top.

For the border cut 2 strips 16 7/8" x 3", add to two sides.
Cut two more strips 21 1/4 x 3" and add to the other two sides.

Admire your quilt top!

I'll be back with quilting ideas!

Thursday, January 30, 2014

Midwinter Blues part 2

If you've done my quilalongs before you may have made 1/2 blocks. You cannot make a full block and just whack it in half and use both sides. You need a seam allowance so everything fits together properly.We will make 4 half blocks.
From your blue cut four (4) 4" x 2 1/2" rectangles.
We will piece the side triangle the same as we did in the previous step.
From brown cut two (2) 2 1/8" squares, then cut on the diagonal  for 4 triangles. We will only need 3 of them.
From your tan floral print cut five (5) 2 1/8" squares then cut those on the diagonal to make 10 triangles. We will only use 9.
Look at the photo and the section on the left. It seems like you would not have to add  the extra triangle, but we still need a seam allowance so add a triangle. (I have a secret, On my other half blocks I used a scrap triangle and not even from the same fabric as the other ones! Most of it will be cut off!)
 Be sure to iron and trim off any dog ears.
 Get your square ruler and line up your corner, just like you would if you had a full block and trim. Keep your 1/4" seam allowance if it is possible, if not, it isn't the end of the world.


Now we need to cut the block in half. Line up your ruler so you are 1/4" past the center. and trim excess block. I wish I would have gotten a better photo, so be sure to let me know if you do not understand.
Make 4 half blocks.


On the original quilt, which you can see here , the corner setting triangles are quite a bit different than the fabric used in the blocks and I opted to make mine that way as well.  Choosing what you like will make the quilt uniquely yours!

I oversize my triangles and trim them after the quilt is put together. Because I used 4 different fabrics this is what I did for my corners. Cut a 5" square of paper and cut on the diagonal to get a triangle. Lay this on your fabric corner and cut a triangle. If you prefer to cut a square from the fabric that will work too,  but then you will have an extra triangle.

I am thrilled to see so many working on this little quiltalong! I'm giving plenty of time for each step so everyone can keep up and be able to share in the linky party at the end.

Happy Thursday!


Tuesday, January 28, 2014

Creative Mess

What a mish mash I have on my design wall. There aren't enough hours in the day to get all I want accomplished. I've got my Flowers project, hst sashing,  a new Valentine/red/pink mini, my antique signature block, (bought a frame, it looked like crap) and a background for a Halloween project!
My sewing table isn't much better......
Please tell me I'm not the only one with long strips of batting hanging around. LOTS of strips. It is really annoying. I put mine to use once in awhile.

Overlap them a little then use a big zig-zag stitch to sew it together.
Trim some of the overlapping backing.
Use.

Have a fantastic Tuesday.

Friday, January 24, 2014

MidWinter Blues Quiltalong! Please Join Me!

I ended up sticking with the block I showed you earlier. As I played around with a setting it morphed into this, that I am calling Midwinter Blues. And not because there is anything depressing about it but  because blue and tan/brown tends to have a calming effect. The final quilt measures 21" square.
I don't think we have  done any quiltalongs with sashing, so I thought now was a good time- sashing with on point blocks and we have the half-blocks again.

It is hard for me to tell you how much fabric you'll need. I used a different blue, tan and brown for each block. So I'll give you the sizes and let you figure out how you want to do your "midwinter blues". I knew I wanted my backgrounds to be floral, that was my only criteria.

We will start by making 5 blocks that finish at 5".

Cut your fabric this way:
Blue- one (1)  4" square
Dark brown- two (2) 2 1/8" squares, then cut on the diagonal for 4 triangles
Tan-  six (6) 2 1/8" squares cut on the diagonal for 12 triangles.

Lay your block out so you can see how it will be assembled.
Pair up a brown and tan triangle and make 4 half square triangles. They will measure 1 7/8". Trim the dog ears.
Add a tan triangle to one side, as shown. Press to the triangle and add the other side.
When you have 4 of them made we will add them to the blue square on opposite sides first. I can eyeball the center, but if you'd like,  make a little mark on the center of your blue and line up your outside triangle to the mark and sew. Press towards the center.
Add to the other 2 sides but this time press out.
I give it a nice press on both sides with a hot iron.
Trim to 5 1/2". Tada! Admire your cute little block. Now make 4 more. (my photos disappeared when I was making them for the quilt so I made another one after the quilt top was put together- that is why you do not see this block in my top)

Here is the quilt that inspired me. As you can see I had to change it to make the mini quilt work. 
I hope you like Midwinter Blues and will be sewing along!!