One of these was my practice block and it pieced beautifully so I made another one!
My blocks are 16" and that will be what the directions are for.
I could not get my lines in Electric quilt to line up, so I'll be giving you step by step instructions.
We need to make 24 half square triangles.
For my first block I used the easy angle ruler and 2 1/2" strips.
For the second block I ordered triangles on a roll that finish 2",
When making a lot of the same 2 fabrics this is the option I like. Sew on the dotted lines, cut on the solid lines
I did forget to cut the outer lines! Oops! Use a small stitch and remove paper.
I am piecing my block in quadrants. It really makes it easy.
We will start with the upper left, then lower left, upper right and lower right.
The plain blocks in upper left are cut 2 1/2" (you need 3) Piece as shown.
Then we will piece lower left.
You will need 9 red/white half square triangles and then from red you will cut 4- 2 7/8" squares then cut on the diagonal to get 8 triangles. Refer to the diagram for layout. For the plain large triangle you will cut 1 square 6 7/8" then cut on the diagonal. (use the other triangle on the upper right quadrant)
The upper right quadrant is similar using 9 half square triangles and 3 red triangles and the other 6 7/8" triangle.
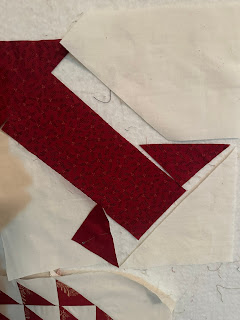
The last piece will need templates. Let me know if you are using this pattern and I will send you the template. Some people get concerned, but this is easy!
For the large red triangle cut one square 4 7/8" square then cut on the diagonal. You will only use one.
The tree trunk measures 8 1/4"x 3 3/8"
You should have 2 small triangles leftover from the earlier step. For the lower white triangle cut 1 square 5 7/8" then cut on the diagonal. You can use the other triangle in another block. For this one you will only use 1.
I layer my light background under my template.
Then line up my ruler and cut! Easy!
Center the little red triangles to the background and sew. Be sure it is all laid out properly. Check the diagram before sewing.
Then sew background to stump.
Then add lower light triangle and the upper red triangle.
You are so close to having your first block completed!
Sew your 4 sections together, press and admire your block!
Email me at humblequilts@gmail.com if you want the template or have any questions.
Here is an alternative to using a template if that interests you- find it HERE.


.JPEG)
.JPEG)
.JPEG)

.JPEG)


.JPEG)


Love it! I email you for the template. Did you copy the template onto freezer paper to stick to the background fabric for cutting?
ReplyDeleteI did not but that's a great idea!
DeleteGreat instructions, you make it look understandable if not easy.
ReplyDeleteLove the Tree of Life quilt you posted earlier in red and white. Simply beautiful!
ReplyDeleteYour blocks look great, and your instructions are nice and clear.
ReplyDeletehave wanted to make this for sometime. will follow these instructions. thanks, will email for templet.
ReplyDelete